
Depending on the course and the task at hand, I use Rnote, Markdown, or simply pen and paper to take my notes. Additionally, I sync them to my Nextcloud instance. I’ve created an automated process that renders my notes, regardless if taken in Markdown or Rnote, and uploads them to my website. On top of that, I created a system that saves my pen and paper notes to the correct folder on my Nextcloud Instance using QR Codes.
Rnote and Markdown
After one semester of studying, I had a problem with my note-taking: in some courses, I preferred taking notes by hand with Rnote. For others, I preferred Markdown with some LaTeX in them, for which I used the markdown-preview vim plugin.
My goal is to merge these two distinct ways of taking notes into one “user interface” for looking at said notes. Furthermore, I wanted to share these notes sometimes, so it’d be great if they were automatically uploaded to my website.
This blog-post is designed to give you ideas on how to take and render your lecture notes. I’m not sharing all of my code, as it is only designed for my specific infrastructure and use-case. Fortunately, the implementation itself with the tools provided is very straightforward.
Example: Markdown notes

Main-tools used:
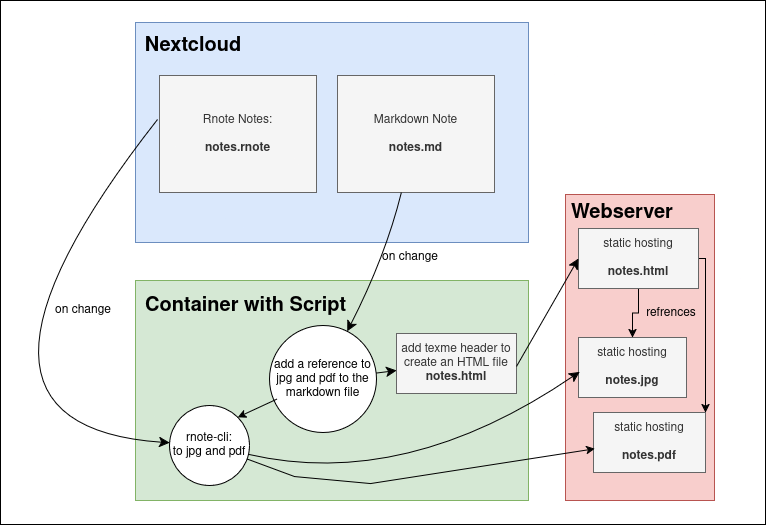
I mounted the Nextcloud homework files to a Docker container. If changes occur on Rnote, a script within the Docker container detects that the file has changed and will generate a pdf and jpg of the notes:
# Export notes to svg
rnote-cli export "$folder/notes/${name}.rnote" --on-conflict overwrite doc --output-file "/output/${name}.rnote.svg"
# Export notes to pdf
rnote-cli export "$folder/notes/${name}.rnote" --on-conflict overwrite doc --output-file "/output/${name}.rnote.pdf"

# Convert svg to pdf
# I specifically use vips here, as imagemagick has an issue with too large svgs!
vips copy "/output/${name}.rnote.svg"  "/web/${name}.rnote.jpg"
The web files will then be displayed via an Nginx web server that is hosting the static texme, which converts Markdown to a beautiful website like in the picture above - which is very cool.
Texme can also display LaTeX, similar to the markdown-preview vim plugin, which means my Markdown Notes can have LaTeX in them.
My script takes my Markdown notes from the Nextcloud mount, as well as a link to the Rnote image and combines them into the result you see above or at the top of this page.
Since I do think this is quite confusing to explain in words, here’s a diagram:
Simplified procedure
Pen and Paper
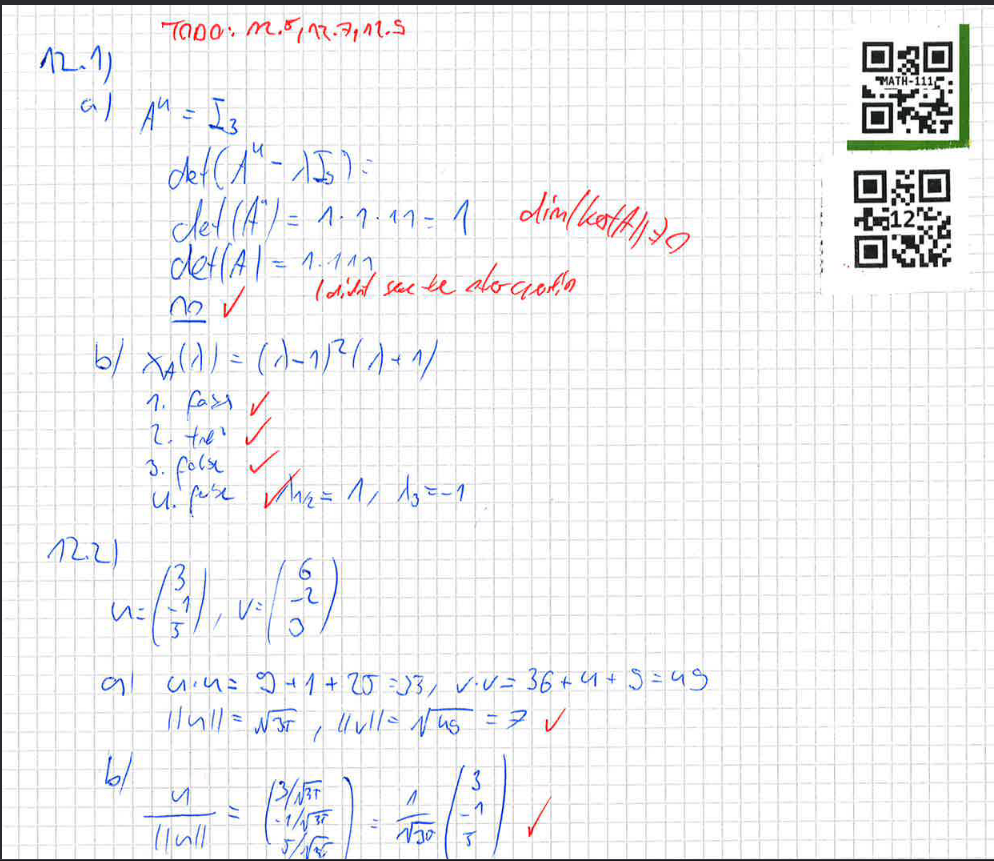
Computers and tablets can be distracting at times. I realized this when doing math homework. You’re casually solving a differential equation on your tablet with Rnote when suddenly a pop-up appears and BAM! Your focus is gone! So, I decided it was time to go back to pen and paper.
The issue is - how do I digitally organize my notes written in pen and paper? The solution is simple: I use stickers with QR codes on them. Depending on which course my homework belongs to I stick a QR code with the name of the course on my paper. And I do the same thing with a QR code displaying the current week of the semester.
Example: Handwritten notes
Main-tools used:
- A mount to wherever your notes are hosted (In my case Nextcloud)
- qreader
- zbarimg
- imagemagick
- attachment-downloader
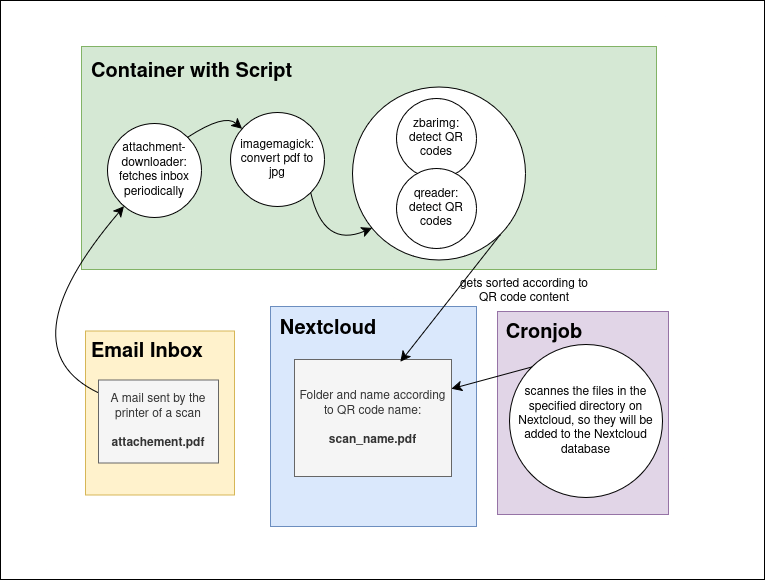
The printer at my university has a feature to send scans directly to my email address. So I wrote a script that fetches these emails and downloads the attachments using attachment-downloader and converts them to jpg via imagemagick.
It took quite some time until I could find a reliable QR code reading library.
As I only wanted to use bash, I tried zbar. Zbar has a simple CLI interface, but it was too unreliable.
In the end, I had to use a bit of python and qreader, which works perfectly!
from qreader import QReader
import cv2

qreader =QReader(model_size = 'l', min_confidence = 0.1)
image = cv2.cvtColor(cv2.imread("$f"), cv2.COLOR_BGR2RGB)
decoded_text = qreader.detect_and_decode(image=image)
for t in decoded_text:
	print(t)
To really not miss any QR codes, I do still also use zbarimg to look for QR codes. Depending on the scan, qreader and zbarimg may still have problems reading the codes. This is why the script also converts the pdf from printer to black and white, to better detect the codes:
convert -density 190 "${file}" +repage -threshold 50% -morphology open square:1 "${file}.0.jpg"
According to the result of the QR Code, the script puts the image into the correct folder on the Nextcloud mount and names it correctly. For the files to appear in Nextcloud, the files must be scanned, as they are not yet in the Nextcloud database:
php occ files:scan --path=user/files/Documents/Path/To/My/Homework
As I once again think this whole process is quite confusing to explain in words, here’s a diagram:
Simplified procedure
Summary: Is it worth it?
All this work— is it worth it or just over-engineered? For me personally, it is totally worth it, especially my pen and paper QR code solution. There is nothing more satisfying than scanning in your homework and knowing you’re done with it, and it gets automatically sorted for you.
It feels extremely rewarding, and I genuinely think it made me like homework more. All in all, this project was a lot of fun, and I’d do it all over again.